Saturday, July 13, 2019

Prepping Tools Needed for Fleeces

Tools = $$$$$

Shortly after getting the first alpaca fleeces, I knew I needed some tools to help me on my way.  I immediately went to the internet.  After seeing the dollar amounts.  I was disheartened.  

I read books, perused blogs and watched videos.  There were some things I thought my husband could make for me.  -  That didn't work out for me. The DIY cleaning box directions were easy enough to under stand but would require tools my husband didn't have and (shock) didn't want!

So.........................................being a frugal (ie cheapskate) I started searching.  The Vegetable Matter (VM) had to be removed.  So I "borrowed" some of my husband's gloves for staining wood.  I picked as much out as I could see.  I then used a dog comb - yes -I said dog comb to some more VM out.


After washing comes the drying.  I like to dry mine in the sun.  (Which has been hard with all the rain we have had this summer!)


That is a piece of chicken wire rolled into a half circle.  The net bags I wash are laying beside it.  That is an old over the bathtub drying rack too.  I set it up so part is on the deck and the rest in the yard.  The important part is letting air get to it.  This is hair.  The thicker you lay it out the longer it takes to dry.


When first washed, mine look like dreadlocks.  (Remember I am self taught so I might be doing something wrong.)  It works for me though.

Now they need fluffed.   The black I did today was the first "fresh" fleece I had worked with.  It was cut this year.  The rest I have worked with had been stored for a year.  This had more oil to it than the older stored fleece.  No matter how much VM I got out there was more.  Perhaps it is because black absorbs heat and the black alpaca rolls in the dirt more to stay cool.  

The tiny white specks that look like dandruff-VM. This black alpaca has not found Lady Clairol yet!  😏  Those are pure white hairs you see mixed in with the black.  
The next part involves combing the fibers or fluffing them up in some way.  I used that dog comb to fluff some at the beginning.  I quickly realized I needed combs.  Off I went to the internet again. 

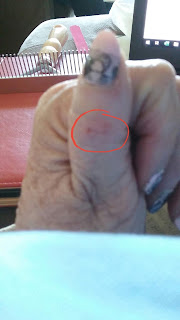
Since I was new to prepping my own fleeces, I went with inexpensive combs.  They work great for me.  I did invest in a blending board when I found it could be used for combing too.   I like dual use tools.   The combs are great but I will warn you of one thing.  When your hands or brains are getting tired!  ✋  STOP!!!!  Those combs are sharp.    This thumb had all its skin this morning! 

The fluffed fiber looks lighter than it did fresh from washing.  


Can't wait to get started on the black but first I need to find an empty spindle!  

One other tip- this from our heating and cooling man- clean your air filters or replace more often if you are working with fiber in your home!  It tends to clog the filters faster!  (Ummm - it freezes up!  Making the house hot!)  At least he got a good laugh and I learned how to wash our furnace filters and put that on the calendar every two months. (Ours are metal and washable) 


Monday, June 17, 2019

SHARING SPINNING WITH THE NEXT GENERATION


SPINDLES AND LITTLE GIRLS


Three delightful young ladies visited our house yesterday!  Their mom and Dad had lived next door when the oldest was born.  We have been able to keep in touch.  (I do love Facebook for things like that!)  Sarah, their grandmother made that visit possible.  She brought them by with her their Mother, Jen,  for just a short visit.  


The spindles intrigued them.  Soon  there a was demonstration on  how to spin.  

They all had a chance to try the spindle while I pulled the wool for them.


The joy of watching a 9, 6, and 3 three year old spin the spindle and the wonder their eyes reflected as wool became yarn. 

Their moments of success were so blissful.

The chance to share the journey with them was phenomenal.  Sue thanks for sending me down the path!  

FREE ALPACA FLEECE!!!! OF COURSE I WILL TAKE IT

FREE ALPACA FLEECE!!!!  

Imagine getting an email that offers you free alpaca fleeces!!  I got such an email and replied of course I will take the fleece!  

Upon sending that email I realized I knew nothing about prepping alpaca fleece for spinning (or any other fleece for that matter.)

Off I went to research.  I read books.  I watched videos.  I researched.  I got confused.  I was anxious about what I would do with it.  So many ways and so much conflicting information.  The fleece arrived.  Six large black garbage bags full!  I was in heaven.  It felt wonderful!  I had visions of beautiful fiber coming off my spindles.  

Getting the bags in my trunk was so much fun.  Then sneaking them in the house before I could tell my husband what I had done.  It was a great adventure and my husband (who really is very supportive of my fiber habits) was shocked when he saw how much there was.  


Now came the real adventure................................learning what to do with it.

I started by donning rubber gloves to pick the vegetable matter (VM) out of the fleece.  That should really be done in a very well lit area and preferably outside! There are tools to help you with this but I chose not to go that route at they were expensive.  

Now I needed something to wash it in and something to dry it on.  I found net bags meant for delicate washables and used those to wash my fleece in.  Several books, articles and videos recommended them as the best way to keep your fleece together.  

We have an old fashioned wash tub in the basement.  Perfect for washing the fleeces.  Get the water as hot as you can. Put several inches of water in it so the bags are able to be submerged. Several references said to squirt a couple of tablespoons of Dawn dish detergent in the water and swish it around.  No bubbles wanted.  Submerge the bags and let them sit for 30 minutes.  


Squeeze the water out of the fleece in the bags. Set aside.  Drain the dirty water out of the tub and fill again with the hottest water that will come out.  Put the bags back into rinse them.  Just 5 minutes for this step.  I repeated 2-3 times until the rinse water was pretty clear.

1st rinse only


Now its time to take the fleece out of the bags and lay them out to dry.


I also have a half circle of chicken wire that I use to dry the fleece on  (picture the next time we have a pretty day to dry fleece. )  It really has to be a pretty day and it needs to be warm.  Alpaca  fleece are like really thick hair.  It takes time to dry out!

But it is so worth the wait! 


There is still VM that has to come out at times but this is a learning process.  
I can spin from this type of preparation .  I also card some of it to make it easier to spin.  I am trying my hand rolags but so far I am not doing great at them.  Think small tree branches verses chunky pencil!  But I am having a blast!

I have nature colors of white, honey, brown and black.  

I have learned a lot but there is so much more to know.  I know I am having fun and learning lots.   

What will I make?  

More yarn of course!


Thursday, June 13, 2019

Down the Rabbit's Hole

DOWN THE RABBIT'S HOLE

I come from a family of knitters, crocheters, weavers and spinners.  For the first 58 years of my like I was content to knit or crochet.  Then I got my first rigid heddle loom and I was hooked on weaving.  My cousins, Sue and Carol,  were very supportive of me in this endeavor.  And then I started spinning.  I would send pictures of my spinning and they were very complimentary.  Isn't wonderful how family supports you.  

They kept saying I was down the rabbit hole.  At first I did not get what they meant.  

Then my first drop spindle was joined by a large and small supported spindle.  You need to spread your wings and make sure you like the top whorl you have.  I found I like a top whirl spindle.  I was spinning two types of yarn so I needed another top whirl. 


I could tell I was getting better at this but it took a long time to see the progress I was making.

I went along enjoying myself spinning and dropping and using a few choice words.  Life was so fun.

I found myself on Pinterest looking at the drop spindles and I knew I was in in real trouble.  I loved them.  

I saw the plans for a kick spindle and asked my husband to make me one.  After looking at the plans, he said he would buy me one for my birthday so off I went in search of one I liked the looks of.  (We have no where near here to look before buying spinning supplies.)


I have a Turkish spindle on its way!  Yes!  I am down the rabbit's hole!  


SPINNING

It started out from a comment my cousin, Sue, made.  I just love spinning and creating my own yarn.

I had never thought of making my own yarn.  It sat there percolating in my brain for over 2 years.  

The next thing I know, I asked for a spinning kit for Christmas.  My husband is always thrilled when I provide gift ideas.  So it was ordered right away.  I needed to finish a baby afghan I had started so the drop spindle kit was my "carrot" at the end of the project!  

The middle of January found me dropping my spindle more than spinning.   I finally got the hang of it and I was into yarn making.  Oh it had it big and little-thick and thin places but I was feeling accomplished!  


I kept up and things got a little better!  
I added some color and felt like I was getting somewhere.  
Now in this process I had to add my spinning tools.  I got a lazy Kate (my Valentine's day gift) to help me ply my yarn and a kniddy knoddy to help me prepare for washing my yarn and then putting on my swift before turning it into balls!


Then I had to knit something.  I started with my first spinning and plying and then added the color and and white plied together.


I finished with the big white that I had first spun.  

I was hooked.!